VEXYL Voice Gateway with n8n basic configration
Get your AI voice assistant up and running in minutes with VEXYL Voice Gateway, n8n for workflow automation, Groq for lightning-fast speech-to-text, and Deepgram for natural text-to-speech.
This guide covers the minimal setup to have a working voice AI pipeline connected to your Asterisk PBX.
Prerequisites
Before starting, ensure you have:
- Docker and Docker Compose installed
- An Asterisk PBX (or FreePBX) with AudioSocket support
- API keys from:
- n8n instance (self-hosted or cloud)
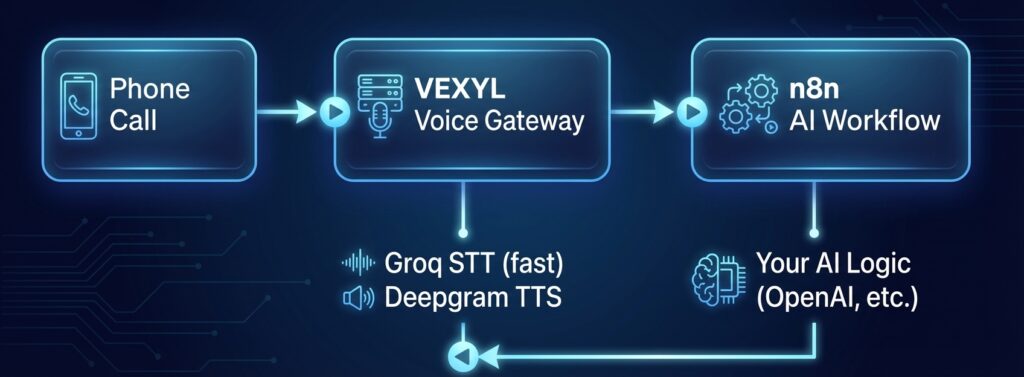
Architecture Overview
Here’s how the components work together:
┌─────────────┐     ┌─────────────────┐     ┌─────────────────┐
│   Phone     │     │     VEXYL       │     │      n8n        │
│   Call      │────>│  Voice Gateway  │────>│   AI Workflow   │
│             │     │                 │     │                 │
└─────────────┘     └─────────────────┘     └─────────────────┘
                            │                       │
                     Groq STT (fast)          Your AI Logic
                     Deepgram TTS             (OpenAI, etc.)
                            │                       │
                            <───────────────────────┘
Step 1: Create Your Project Directory
Create a directory for your VEXYL deployment:
mkdir vexyl-voice-gateway
cd vexyl-voice-gatewayStep 2: Create the Environment File
Create a .env file with your configuration:
# .env - VEXYL Voice Gateway Configuration

# === REQUIRED API KEYS ===
SARVAM_API_KEY=your_sarvam_api_key_here
GROQ_API_KEY=your_groq_api_key_here
DEEPGRAM_API_KEY=your_deepgram_api_key_here

# === PROVIDER CONFIGURATION ===
# LLM Provider - using n8n for AI logic
LLM_PROVIDER=n8n

# STT Provider - Groq for fast, accurate transcription
STT_PROVIDER=groq

# TTS Provider - Deepgram for low-latency speech
TTS_PROVIDER=deepgram

# === n8n WEBHOOK CONFIGURATION ===
N8N_WEBHOOK_URL=https://your-n8n-instance.com/webhook/voice-assistant
N8N_TIMEOUT=30000

# === PORT CONFIGURATION ===
# HTTP API port
HTTP_PORT=8081
# AudioSocket port (Asterisk connects here)
AUDIOSOCKET_PORT=8080

# === AUDIO SETTINGS ===
# Buffer duration before processing (ms)
MAX_BUFFER_DURATION=3000
# Enable interruption detection
ENABLE_BARGE_IN=true
BARGE_IN_USE_VAD=true

# === OPTIONAL: TTS CACHING ===
TTS_CACHE_ENABLED=true

# === OPTIONAL: CALL TRANSFER ===
TRANSFER_ENABLED=true
TRANSFER_EXTENSION=operatorStep 3: Create Docker Compose File
Create a docker-compose.yml file:
version: '3.8'

services:
  vexyl-gateway:
    image: vexyl/vexyl-voice-gateway:latest
    container_name: vexyl-voice-gateway
    restart: unless-stopped
    ports:
      # AudioSocket port - Asterisk connects here
      - "8080:8080"
      # HTTP API port - health checks, session management
      - "8081:8081"
    env_file:
      - .env
    volumes:
      # Persist TTS cache between restarts
      - vexyl-cache:/app/cache
    healthcheck:
      test: ["CMD", "curl", "-f", "http://localhost:8081/health"]
      interval: 30s
      timeout: 10s
      retries: 3
      start_period: 10s

volumes:
vexyl-cache:Step 4: Set Up n8n Webhook Workflow
Create a new workflow in n8n with the following structure:
4.1 Add Webhook Node (Trigger)
- Add a Webhook node
- Set HTTP Method to POST
- Set Path to
voice-assistant - Copy the Production URL to your
.envfile
4.2 Add AI Agent Node
Add an OpenAI node (or your preferred LLM) with this system prompt:
You are a helpful voice assistant for [Your Company Name].

IMPORTANT: Keep responses concise (1-2 sentences) as this is a phone conversation.

You can help with:
- Answering questions about our services
- Scheduling appointments
- Providing order status

Guidelines:
- Be friendly and professional
- Ask clarifying questions when needed
- If you cannot help, offer to transfer to a human

When the caller wants to speak to a human, include in your response:
"shouldEscalate": true

When the conversation is complete, include:
"shouldHangup": true4.3 Add Respond to Webhook Node
Configure the response to return JSON:
{
  "response": "{{ $json.message.content }}",
  "shouldEscalate": false,
  "shouldHangup": false
}Complete n8n Workflow Structure
[Webhook] → [OpenAI Chat] → [Respond to Webhook]Activate the workflow in n8n before proceeding.
Step 5: Start VEXYL Voice Gateway
Launch the gateway with Docker Compose:
# Pull the latest image
docker compose pull

# Start the gateway
docker compose up -d

# Check logs
docker compose logs -fYou should see output like:
🚀 VEXYL Voice Gateway Starting...
📡 HTTP API listening on port 8081
🔌 AudioSocket server listening on port 8080
✅ STT Provider: groq
✅ TTS Provider: deepgram
✅ LLM Provider: n8n
✅ n8n webhook connectedStep 6: Verify the Setup
Check that everything is working:
# Health check
curl http://localhost:8081/healthExpected response:
{
  "status": "ok",
  "providers": {
    "stt": "groq",
    "tts": "deepgram",
    "llm": "n8n"
  }
}Step 7: Configure Asterisk
Add the AudioSocket application to your Asterisk dialplan.
Edit extensions.conf
[voice-assistant]
exten => 100,1,NoOp(Connecting to VEXYL Voice Gateway)
 same => n,Answer()
 same => n,Set(CHANNEL(audioreadformat)=slin)
 same => n,Set(CHANNEL(audiowriteformat)=slin)
 same => s,n,Set(RAW_UUID=${SHELL(uuidgen)})
 same => s,n,Set(SESSION_UUID=${TRIM(${RAW_UUID})})
 same => s,n,Set(CURL_RESULT=${CURL(http://your-vexyl-server:8081/session/${SESSION_UUID}/metadata,callerid=${CALLERID(num)}&name=${CALLERID(name)}&language_code=$>
 same => s,n,AudioSocket(${SESSION_UUID},your-vexyl-server:8080)
same => n,Hangup()Replace your-vexyl-server with the IP or hostname of your Docker host.
For FreePBX Users
Create a Custom Destination pointing to:
[voice-assistant]Then route an inbound route or IVR option to this destination.
Step 8: Test Your Voice Assistant
- Call the extension you configured (e.g., dial 100)
- Speak to the AI assistant
- Check logs for any issues:
docker compose logs -f vexyl-gatewayEnvironment Variables Reference
Here’s a quick reference of the key environment variables:
| Variable | Description | Required |
|---|---|---|
SARVAM_API_KEY | Sarvam AI API key | Yes |
GROQ_API_KEY | Groq API key for STT | Yes* |
DEEPGRAM_API_KEY | Deepgram API key for TTS | Yes* |
LLM_PROVIDER | Set to n8n | Yes |
STT_PROVIDER | Set to groq | Yes |
TTS_PROVIDER | Set to deepgram | Yes |
N8N_WEBHOOK_URL | Your n8n webhook URL | Yes |
HTTP_PORT | API port (default: 8081) | No |
AUDIOSOCKET_PORT | AudioSocket port (default: 8080) | No |
*Required when using that provider
Troubleshooting
No audio response
- Check that
DEEPGRAM_API_KEYis valid - Verify TTS_PROVIDER is set to
deepgram - Check Docker logs for TTS errors
Speech not recognized
- Verify
GROQ_API_KEYis valid - Ensure STT_PROVIDER is set to
groq - Check if audio is reaching the gateway (look for “Audio received” in logs)
n8n not responding
- Verify
N8N_WEBHOOK_URLis correct and accessible - Ensure the n8n workflow is activated
- Test the webhook manually with curl:
curl -X POST https://your-n8n-instance.com/webhook/voice-assistant \
  -H "Content-Type: application/json" \
-d '{"message": "Hello", "sessionId": "test-123"}'Asterisk connection issues
- Ensure port 8080 is accessible from Asterisk
- Check Asterisk has AudioSocket module loaded:
module show like audiosocket - Verify the dialplan is loaded:
dialplan show voice-assistant
Why This Stack?
Groq STT
- Ultra-fast transcription (under 1 second)
- High accuracy with Whisper models
- Generous free tier
Deepgram TTS
- Sub-200ms latency
- Natural sounding voices
- Streaming support
n8n
- Visual workflow builder
- 400+ integrations (CRM, calendars, databases)
- Self-hostable and open source
- Easy to modify AI logic without code changes
Next Steps
Once your basic setup is working, consider:
- Adding Redis for persistent session storage across restarts
- Enabling TTS caching to reduce latency and costs
- Setting up call transfer to route to human agents
- Building advanced n8n workflows with database lookups and API integrations
- Adding outbound calling for appointment reminders
Resources
This guide gets you started with a minimal configuration. For production deployments, refer to the complete documentation for security hardening, scaling, and advanced features.